Step 1: Tables
After renting a table at my first craft show for $25.00 I saw that it wasn’t going to be very lucrative to continue renting at this cost. I found I could purchase a table for $30 on sale. Do the math. If I rent two tables per show and I do three shows, the rental fee could have already bought three tables. So buy rather than rent. Look for sales. I started with a six foot table from target and added on three four foot tables as the year went by. I used bed risers (I tried raising them with pvc but didn’t like the lack of stability) to raise the table height. Since then, I sold those tables and bought four-four foot tables from Sam’s club ($35.00ea). They fold in half and are height adjustable. These work well with most craft show configurations, are compact and now I don’t have to carry 16 bed risers around. Live and learn.
Tuesday, April 3, 2012
Tuesday, March 27, 2012
Evolution of a Craft Show Booth

Then (2006)
 Now (2011)
My craft show booth has evolved over the years. I began with a small budget so I improvised and gradually improved over the years. (Notice: I said “years”) My advice: adjust what you read in this article to your tastes and wallet, keep the color pallet simple, black and white never go out of style and don’t distract from your jewelry, don’t try to do everything at once, buy what you can afford and make adjustments and improvements as you go along. Improvise. Don’t have the money for shelves, buy a $1 photo box and drape it with material. Use your creativity and use found objects to achieve the look you want. Keep it simple. Your display should be the backdrop for your jewelry.
I’ve seen a lot of questions regarding craft show booths and how to get started. This will be installment one on the evolution of my booth through the years. Hopefully it will answer some of the questions beginners have when getting into the craft show business.
Each week I will take one aspect of my booth and break it down into easy steps for a limited budget and how to gradually evolve. (tables, skirting, backdrop, displays, adding height, lighting, signage) Please feel free to add comments or ask questions!
Next week: TABLES
Sunday, February 7, 2010
How to Clean Different Types of Jewelry
Are you looking for one way to clean all your jewelry?
I'm sorry to tell you...there isn't one. Because some stones are hard (like diamonds) and some are soft and porous (like opals and pearls) they cannot be cleaned in the same manner. Throw in some metal and that only makes it more complicated. I have tried to put all the info I've found in it's simplest form.
Gold, silver, diamonds, rubies, sapphires, amethyst, citrine, and garnet can be cleaned simply with a mild liquid detergent and water using a soft brush if needed. Rinse with warm water and dry with a soft cloth. It is also safe to clean these in an ultrasonic cleaner.
Emeralds, turquoise, peridot, coral, mother of pearl, and opals, should be cleaned first with a soft, damp cloth. If necessary, a mild detergent can be used with a soft cloth, then rinsed and dried. However, they should not be soaked in a liquid and never in an ultrasonic cleaner.
*general rule of thumb: if it's a soft stone, it will absorb liquids and could damage the stone, so use the most gentle form of cleaning possible*
Sterling silver: (without stones or crystals) I highly recommend a silver polish cloth (usually a white cloth sewn together with a blue or red cloth). The white side cleans off the tarnish and the blue/red side polishes. For difficult to clean areas and small chains (although most jewelers would tell you otherwise) I use toothpaste and a soft brush. I've found no other way to get into the small links (unless you have an ultrasonic cleaner). Rinse with warm water and dry with a soft cloth.
Copper and Brass can be cleaned with a standard copper or brass cleaner. If the piece also contains stones, I would recommend using a mild soap and a soft brush.
Do you love costume jewelry but are disappointed that it doesn't last long? The key is to treat it as well as your good jewelry. Most of us tend to just throw it on a dresser, but with a little care it won't last forever, but will last longer. Clean it gently in a mild liquid soap and water with a soft brush. Dry it with a soft cloth before you place it in a tarnish resistant jewelry box or ziplock bag with antitarnish strips (can be purchased at most bead stores).
*Most important of all is to clean your jewelry before putting it away to keep it looking great.
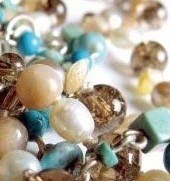
Below is a picture of a base metal necklace that I made three years ago. It's been kept looking great by cleaning before putting it away for the season.

Thursday, January 21, 2010
Gotta Have It!
I was sitting at my work area trying to cure the winter "blahs" when I started thinking about my 2009 favorite things. (Yes, I'm easily distracted)
I would have to say that one thing that would be at the top of my list would be my "Silver/Gold Safe Keeper". What is that? Well, after living my life with a standard jewelry box that is constant need of organizing, I decided to go in search of a better solution.


ps. Check back soon for my next post on how to best clean your jewelry
Silver/Gold Safekeepers on QVC
I would have to say that one thing that would be at the top of my list would be my "Silver/Gold Safe Keeper". What is that? Well, after living my life with a standard jewelry box that is constant need of organizing, I decided to go in search of a better solution.


I found it at QVC. They have a full line of jewelry boxes that are lined with a special material to prevent tarnishing. Hallelujah! These are not your standard jewelry boxes. They have a great selection for all budgets. They have a 3 piece set with one for travel, one for hanging etc. They have all sizes. They have some that sit on a dresser and rotate, some that mount on the wall, and even some larger ones that mount on the wall. I spent a little more than I wanted to but I'm glad I did. I bought the model that mounts on the wall (above) and is about the size a of a medicine cabinet. I love it! It has plenty of room for earrings, necklaces, bracelets, rings, and a few spaces for little odds and ends. It has room for all of my jewelry and room to grow. If you want to keep your jewelry looking great, a silver safe keeper is my #1 recommendation.


ps. Check back soon for my next post on how to best clean your jewelry
Silver/Gold Safekeepers on QVC
designed by Lori Greiner and are priced $22.00 and up.
Tuesday, January 19, 2010
Stay Tuned...
I am not a writer. Why am I doing a blog? Well, I guess like many others I think that I have information that I'd like to share. This will be mostly about beading, latest projects, new ideas, and what the hot jewelry trends are for the season. But it will also include information about: how to clean your jewelry, how to keep it from tarnishing, what necklace is most flattering for your face shape and how to care for your jewelry to keep it looking as good as the day you bought it.
So stay tuned and check back often.
Kathi
So stay tuned and check back often.
Kathi
Subscribe to:
Posts (Atom)